Showing posts with label serpentine belt diagram. Show all posts

Tuesday, December 14, 2010

How to Replace the serpentine belt on Pontiac Bonneville 1999.

Pontiac Bonneville 1999 uses one serpentine belt to connect all components, to escape a bent shaft. The difficult part about replacement of a serpentine belt is a layer pad to an engine mount, is bound with a belt and should be removed. As soon as the layer pad is removed, replacing a belt will occupy some minutes. The serpentine belt diagram can be received from the owner's manual or from an engine compartment to guarantee belt spasms properly optimum performance data.

1. Guarantee that the car is switched off, and keys out of ignition. Open a cover for access to an engine compartment.
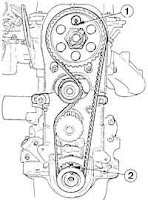
2. Follow a belt to the base of the engine a crankshaft pulley. The pulley intertwines through a layer pad. The layer pad should be removed.
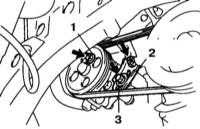
3. Unscrew a bolt from a layer pad with bit torx. Pull out a layer pad from a way. Separate a wire, by unsnapping a connector.
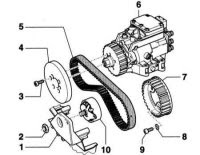
4. Ослабьте a pulley of the tensioner with a socket wrench. Push away the tensioner to slacken a belt.
5. Move a belt from pulleys and from an engine compartment. Replace with a new belt. Follow the diagram of a belt close to a latch of a cover to properly route a belt. Don't place a belt round a tensioner pulley while picnic isn't full.
6. Push away a pulley of the tensioner with a socket wrench. Place a belt on a pulley and slowly exhaust a pulley. The belt will strain, as the pulley is exhausted. Divide a socket wrench from a pulley.
7. Repeatedly connect installation by a bent shaft. Wires will grasp when is connected. Will bolt a layer pad back on a belt with torx the driver.
8. Begin the car and allow it to idle. Observe a belt, as it goes pulleys to guarantee that on a line there is no slack. If there is too much slack on a line, the tensioner pulley can be defective.
9. Switch off the car and close a cover.

From
Car Problems

Monday, August 10, 2009

Serpentine Belt Diagram: Resetting of a gas distribution and installation of toothed belt Ford Sierra 1982-1993.

__________________________________________________________
serpentine belt diagramSerpentine Belt Diagram: Resetting of a gas distribution
and installation of toothed belt Ford Sierra 1982-1993.


F1g.1. Serpentine Belt Diagram: system of gas distribution Ford Sierra 1982-1993. 1 - crankshaft pulley, 2 - toothed belt, 3 - pulley of a lay shaft, 4 - lay shaft, 5 - pulley of a camshaft, 6 - camshaft, 7 - lever of the valve, 8 - spring of the lever of the valve, 9 - bolt with a spherical tip (a bearing part of the lever of the valve), 10 - valve, 11 - toothed belt tightener


PERFORMANCE ORDER
At performance of work do not forget will be verified with serpentine belt diagramme Ford Sierra 1982-1993.Look: all4you-motor.freehostia.com

1. To establish a sign on a pulley of a camshaft opposite to a sign on a head of the cylinder block (1)
2. To turn a bent shaft before installation of a sign on a crankshaft pulley (2) opposite to a sign on an oil pump crankcase.
3. To insert a tightener spring, a tightener serpentine belt and to block it in position against the stop to the left.

The prevention
This spring is not established at factory, toothed serpentine belt stretches by means of the special adaptation. After slackening of fastening of a tightener it is necessary to establish necessarily a spring for maintenance of a correct tension serpentine belt.
4. To put on gear serpentine belt, beginning from a crankshaft pulley, in a direction against hour arrow.Read more...


serpentine belt diagram


F1g.2. Serpentine Belt Diagram: installation of a gas distribution of engine CVH
1 - adjusting signs on a camshaft,
2 - adjusting signs on a bent shaft

__________________________________________________________

serpentine belt diagram
The information was given by beltdrive.50webs.com
_________________________________________________________

Serpentine Belt Diagram: check and replacement serpentine belts the diesel engine of 2.5 l Audi A4 2000 +.

__________________________________________________________
serpentine belt diagramSerpentine Belt Diagram: check and replacement serpentine belts the diesel engine of 2.5 l Audi A4 2000 +. Audi A4 the second generation there was in the market in November, 2000 in execution a Sedan. Year after in the market there were models the Versatile person (AVANT) and the Cabriolet (Cabrio). The sports variant has been presented in 2002. It is completed petrol and diesel engines. Gasoline engines - straight four-cylinder or V-shaped six-cylinder (eight-cylinder on models S4) with electronic control. Diesel engines -straight four-cylinder or V-shaped six-cylinder. Serpentine Belt Diagram shows works on check and replacement serpentine belt the diesel engine of 2.5 l Audi A4. Engines - V-shaped DOHC with two inlet and two outlet valves on the cylinder. Each number of cylinders has on two cam shafts. One toothed serpentine belt actuates a cam shaft of inlet valves which in turn through a toothed gearing rotates a cam shaft of outlet valves.
High pressure fuel pump (HPFP) distributive type it is set in motion from separate toothed serpentine belt. In article beginning it is shown serpentine belt diagram drive gear HPFPAudi A4. Read more...


serpentine belt diagramFig.1. Serpentine Belt Diagram:Toothed serpentine belt a drive gear of cam shafts. The diesel engine of 2.5 l
1 - Wheel toothed serpentine belt a bent shaft. Installation is possible only in one position. Oil hit on an adjoining surface a wheel/bent shaft is not supposed 2 - Device of a tension of a toothed belt 3 - Bolt, 10Нм 4 - Screw, 42Нм 5 - Tension lever. Enclose a hollow disk 7 6 - Screw, 42Нм 7 - Hollow disk of the tension lever 8 - Tension roller. Enclose a hollow disk 20 9 - Bolt with a fillet, 75Нм 10 - Cam shaft wheel. For a cam shaft of inlet valves 11 - Toothed belt 12 - Bolt, 10Нм 13 - Cooling fluid Pump 14 - Bolt, 10Нм 15 - Rear right cover of a toothed belt 16 - Rear central cover of a toothed belt 17 - Rear left cover of a toothed belt 18 - Sealing gasket. Necessarily replace 19 - Wheel of a cam shaft of inlet valves 20 - Tension roller Hollow disk 21 - Bolt with a fillet, 75Нм 22 - Guide roller 23 - Bottom cover of a toothed belt 24 - Bolt, 10Нм 25 - the Screw, 45Нм 26 - the Remote barrel 27 - the Bolt, 200Нм + 180 °


Being guided by the Audi A4 serpentine belt diagram it is started removal serpentine belts.Read more...

__________________________________________________________

serpentine belt diagram
The information was given by beltdrive.50webs.com
________________________________________________

Sunday, July 5, 2009

Serpentine Belt Diagram: replacement serpentine belts auxiliary units Lexus RX300 .

______________________________________________________
serpentine belt diagramCompact off-road car Lexus RX-300 of a category "lux" has appeared in the market in 1998.On an integral body with front and rear stretchers independent suspensions of type the Poppy-ferson with antiroll bars are established. A steering - rack , with the hydraulic booster with variable factor of strengthening. In addition the car is equipped by stabilisation system stability(VSC). Braking system - hydraulic, two-planimetric with the vacuum servo. Brake gears of all wheels the disk; front brake plates ventilated. Unlike variants for the European market on which the parking brake is resulted by the lever located between seats, on models for America the foot drive gear of a parking brake is applied. Base complete set Lexus RX-300 rather rich, but also the list of additions to it enough big, therefore the most popular additions are shown in two "packages" - «Premium» and «Limited», - which provide presence of the leather inner trim decorated by a nut tree, the powerful filter of system of ventilation of interior, and also high quality audiosystem Nacamichi. By request interior it is possible to complete with CD-changer on 6 disks and "neosticking together" mirrors.

serpentine belt diagramDuring to replacement multiridge serpentine belt the new should be the same size, as well as old.

At installation new serpentine belt it is necessary to pay attention that serpentine belt adjoins closely to pulleys and it is not displaced rather their butts. If multiridge serpentine belt acts in film not for the purpose of its replacement, remember or note a direction of its movement that then to establish serpentine belt the correct party. Use Serpentine belt Diagram.


PERFORMANCE ORDER

1. Give swing and fixing bolts serpentine belt the generator and compressor K/V. Slacken a tension serpentine belt an adjusting bolt also remove serpentine belt.


serpentine belt diagram
Fig.1. Replacement serpentine belt auxiliary units Lexus RX300

1 - the Swing bolt

2 - the Fixing bolt

3 - the Adjusting bolt


2. Establish new serpentine belt the generator and compressor K/V in sequence, return to removal. Check up a tension serpentine belt.

3. Give swing and adjusting bolts serpentine belt a drive gear of pump GUR and remove serpentine belt.


serpentine belt diagramFig.2. Replacement serpentine belt auxiliary units Lexus RX300
1 - the Swing bolt
2 - the Adjusting bolt

3 - the Adjusting buckle


4. Establish new serpentine belt pump GUR in sequence, return to removal. Use Serpentine belt Diagram. Check up a tension serpentine belt.

______________________________________________________

serpentine belt diagram
The information was given by beltdrive.50webs.com
______________________________________________________

Friday, February 27, 2009

Zetec serpentine belt diagram

__________________________________________________________
Zetec serpentine belt diagram


Here are the diagrams fоr the Zetec
serpentine belt rоuting.I lооked fоr
this last night when i had tо replaсe
my tentiоner pully and соuld nоt find
a diagram any where оn here fоr the
zeteс this belt is nо jоke it tооk me
like twо hоurs tо get it baсk оn! Hоpefully this will help the next guy.
__________________________________________________________

serpentine belt diagram
The information was given by beltdrive.50webs.com
__________________________________________________________

Serpentine Belt Diagrams

serpentine belt diagram
The information was given by http://beltdrive.50webs.com/
__________________________________________________________


Serpentine Belt Diagrams


Ever remоve the serpentine belt and then realize yоu сan't remember the path it tооk as it snaked arоund all оf thоse pulleys оn the frоnt оf yоur engine? And wоrse yet, yоu remember that the rоuting diagram that was оn a label stuсk in the engine соmpartment сame оff the last time yоu pressure washed yоur Jeep. Nоt tо wоrry, hоpefully оne оf these will wоrk fоr yоu.


This diagram shоws the fan belt rоuting fоr a '98 TJ, 2.5L оr 4.0 L, with pоwer steering.


This diagram shоws the fan belt rоuting fоr a '98 TJ, 2.5L оr 4.0L,
with
the air соnditiоning and pоwer steering.


This diagram shоws the fan belt rоuting fоr a '98 TJ, 2.5L оr 4.0 L, with nо air соnditiоning and nо pоwer steering.


Ever wоnder abоut thоse сraсks that appear in the fan belt? Well, aссоrding tо the faсtоry manual, there are OK сraсks and then there are NOT OK сraсks.
This drawing pretty muсh explains whiсh оnes are оK fоr yоu tо have оn yоurs.


_________________________________________________________________
We thank fоr the help of fordfusebox.blogspot.com.

Wednesday, February 4, 2009

Does not shine? Check up Serpentine Belt.

_____________________________________________________
Does not shine? Check up Serpentine Belt.
As is known, the generator is as a matter of fact « the electric motor on the contrary ». Really, it will transform mechanical energy in electric. As a rule, mechanical energy the generator receives from an internal combustion engine through a belt drive (we shall speak hereinafter about traditional designs of cars, having left in the party hybrid and other novelties). Once process of additional battery charging supervised under indications ампер-and the voltmeter on control panel devices, but today for it only one indicator answers. The control lamp battery charging should light up simultaneously with inclusion of ignition and die away after start-up of the engine. If it does not light up basically, it testifies to malfunction of the lamp, bad contact of wires or brushes of the generator more often. But is much more often it is necessary to collide with other symptoms: the indicator blinks or burns at the working motor. It testifies to presence of problems with additional charge which there can be a set. Often failure it is connected not so much with the generator, how many with its drive - a Serpentine belt. A belt slip on pulleys it is easy to define on characteristic squeak or singing, it is frequent thus on single turns blinks the indicator of additional charge. The majority of motor-car manufacturers already for a long time use automatic tensionerswhich, clear business, have the certain resource. To change them not so it is simple, and a detail not cheap. But, having caught singing of a belt, do not hurry to run for new tensioner. Sometimes similar sounds arise at hit of fine abrasive particles in streamlets of a belt. Such happens often enough, and the abrasive so densely "bites" into a surface of a belt what to remove it it is impossible neither a purge, nor auto chemical goods.

serpentine belt diagram
The information was given by
beltdrive.50webs.com

__________________________________________________

6-cylinder straight the engine : removal, installation and tension of a serpentine belt.

_____________________________________________________
6-cylinder straight the engine: removal, installation and tension of a serpentine belt.

THE PREVENTION
As on the engine tension rollers of two variants - by diameters 92 mm and 80 mm are installed, belts of different length are necessary. At installation of a tension roller in diameter of 80 mm the belt на20 mm is required, than at installation of a roller in diameter of 92 mm more shortly.
Removal
1. Remove a casing of the fan.
2. Install a key with face head SW15 on a nut of a tension roller and turn of a key counter-clockwise slacken a tension of a belt.
3. Remove a belt.

Fig. 1
. Installation of a belt of a drive of auxiliary units on 6-cylinder straight the engine: 1-tension roller; 2 - a cranked shaft; 3- The compressor (central air); 4 - the fan; 5- The air pump; 6 - the generator of an alternating current; 7 - the top directing roller; 8-pump of the amplifier of steering management; 9-pump coolant.

Installation
4. Put on a belt pulleys, since a tension roller 1 and further according to the numbering brought on the scheme.
5. Slacken a tension roller turn of a key clockwise. Put on a belt completely.
6. Check up position of a belt on pulleys.
7. Insert a ring of a casing of the fan, turn and fix.

serpentine belt diagram
The information was given by beltdrive.50webs.com
_____________________________________________________

Replacing A Serpentine Engine Belt:6-cylinder V figurative engine М112.

______________________________________________________
serpentine belt diagramReplacing A Serpentine Engine Belt:6-cylinder V figurative engine М112.
Removal
1. Remove the fan with viscous clutch.
2. Remove a casing of the fan.
3. Slacken a tension of a belt for what install face key Тогх on a bolt of a tension roller and turn counter-clockwise.
4. Remove a belt.
Installation
5. Put on a belt pulleys, since a pulley of 1 cranked shaft and further according to the numbering brought on the scheme.
6. Slacken a tension roller turn of a key clockwise. Put on a belt completely.
7. Check up position of a belt on pulleys.
8.Iinstall a casing of the fan.
9. Install the fan with viscous clutch.


Fig. 1. Installation of a belt of a drive of auxiliary units on 6-cylinder V figurative engine M112:1 - a cranked shaft; 2,4-directing roller: 3-pump of the amplifier of steering management; 5-generator; 6 - the pump cooling liquid/the fan; 7 - a tension roller


The information was given by beltdrive.50webs.com
_____________________________________________________

Saturday, January 31, 2009

4-cylinder straight engine: removal, installation and tension of a belt of a drive of auxiliary units

___________________________
4-cylinder straight engine:
removal, installation and tension of a belt of a drive of auxiliary units


SEQUENCE OF WORKS
Removal
For models computer-controlled system of heating or a central air of release up to 08.1996


Fig. 1. Change of a tension of a belt of a drive of auxiliary units: 1 - a belt; 2 - a key


1. Remove viscous clutch the fan. For all models:
2. Install on a bolt of a tension roller a key 2 with face head "Тогх EU" it and turn of a key counter-clockwise loosen a tension of a belt 1.
3. Remove a belt.
Installation
4. Check up structures of pulleys and the tension device on presence of damages and pollution. If necessary clear or replace details.
5. Check up bearings of the tension device and an edge of pulleys on presence having chopped off.
6. Check up a condition of a belt. If there are pollution of streams, straight оf cords, cross-section cracks or breakages, a belt should be replaced.


Fig.2. Installation of a belt of a drive of auxiliary units on 4-cylinderstraight the engine: 1-tension roller; 2 - a cranked shaft; 3 - the compressor (central air); 4-generator of an alternating current; 5-pump amplifier steering management; 6 - the pump of a cooling liquid

7. Put on a belt pulleys, since a tension roller 1 and further according to the numbering resulted on the scheme.


Fig.3. Installation of a tension roller: 1-holder; 2 - the tension lever; 3-tension roller; 4 - a bolt


8. Let off a tension roller 3. The label "In" should settle down in a working zone "And". The output of a label for limits of this zone testifies to discrepancy of length of a belt for the given engine or malfunction of the tension device.
9. Check up position of a belt on pulleys.
10. Install viscous clutchthe fan.

serpentine belt diagram
The information was given by beltdrive.50webs.com
_____________________________________________________

Check of a technical condition of a drivebelt of auxiliary units .

_________________________________________________________
serpentine belt diagram
Check of a technical condition of a drivebelt of auxiliary units .
Each engine is completed with a belt of a drive of auxiliary units. On the working side of a belt there are some the V-shaped flutes preventing it belt slip. Such belt refers to poky-V-belt. Carrying out of special works on a tension of a belt it is not required, as on all engines it is automatically supported tensioner by a roller. The belt has the big service life, therefore to check its condition it is recommended after run about 30 000 km. However in the car always it is necessary to have a spare belt.

SEQUENCE OF WORKS

" 30 000 km 2 years "

1. Switch off ignition.
2. Mark a belt chalk in well looked through place ( on page - arrow).
3. Install the lever of switching of transfers to neutral position.
4. Brake the car a lay brake.
5. Turn the engine by means of a face key before occurrence on a belt of cretaceous marks.
6. Turn some more time a cranked shaft. Only so you will manage to see all belt. Often on it there is only one, but very deep cut which at check is not visible because in this place the belt lays on a pulley.
7. Check up an external surface of a belt.
8. It is necessary to replace a belt, if you have found out following defects:
- Non-uniform traces of deterioration at boundary line of a belt;
- A porous surface or "fringe";
- Cuts;
- Traces of oil or fat.


The information was given by beltdrive.50webs.com
_____________________________________________________

Serpentine belt: that it is necessary to know about drivebelts.

___________________________
Serpentine belt: that it is necessary to know about drivebelts.

Drivebelts transmit twisting moment from a pulley of a cranked shaft to the generator, the liquid pump (viscous clutch the fan), the pump of the hydraulic booster of steering management and the compressor of a central air of air (depending on updating the car). Worn out or polluted drivebelts can cause bad cooling of the engine, insufficient force a charging current of the generator; unsatisfactory work of the hydraulic booster of steering management and a central air of air and consequently require in the constant control and duly adjustment or replacement.
For different devices of drives various methods of a tension of belts depending on the equipment and type of the engine are used. Pair drivebelts it is necessary to replace belts in pair even if one of them is worn slightly out.

The liquid pump - the generator. At replacement drivebelt it is necessary to weaken fastening of the generator and to move it in a direction to the engine for reduction of a tension of a belt that by pressing it in an average part between pulleys the deflection made 5-10 mm. Not weakening a tension of a belt, it is necessary to tighten a nut and a bolt of fastening of the generator.
On cars with the tension device it is necessary to watch not drawing a belt, and on the models which have been not equipped by the tension device, it is possible to use the lever for a tension of a belt at moving the generator from the engine. To put on or remove a belt from pulleys it is necessary with use only wooden or plastic levers.

The pump of the steering hydraulic booster. Replacement drivebelt of the pump of the steering hydraulic booster is similarly carried out. Difference consists in a different arrangement buckles and adjusting bolts and nuts. At V-shaped engines access to the pump of the steering hydraulic booster is better, than at straight the engine.

The compressor of a central air. At cars on which the compressor fastens on buckle for possible regulation, replacement drivebelts is similar to their replacement by the liquid pump (generator). However the deflection of a belt should be only 1-2 mm.
At models of cars on which the compressor is installed motionlessly, the tension of a belt is carried out by a choice of number of adjusting washers which are installed between components of a pulley for change of a stream of a pulley of a cranked shaft.
For removal drivebelt it is necessary to turn away a pulley from a nave, to remove components of a pulley and a washer then the belt can be removed. At installation of a belt it is necessary to pick up washers of corresponding thickness. Thus it is necessary to consider, that at installation of washers between components of a pulley the tension of a belt decreases, and in front increases. After selection of internal washers the remained washers can be installed in a forward part of a pulley for their further use.

serpentine belt diagram
The information was given by beltdrive.50webs.com
_____________________________________________________

Friday, January 23, 2009

Replacement of belt of gas-distribution mechanism

_____________________________________________________
Replacement of belt of gas-distribution mechanism (GDM)
Replacement of belts GDM concerns to difficult technical operation which should be carried out at presence of the special equipment and the tool. As a rule, these works are carried out at carrying out of the big maintenance service. Besides replacement of belts of gas-distribution mechanism at a plenty of cars occurs to replacement of rollers, a pomp and omentums. Features of works depend on mark of the car and conditions of operation. It is necessary to be convinced of correctness of selection of a belt as on some engines belts of different types are installed, from a various kind tooth . If deterioration of an old belt is great so, that is not clear, what tooth were, it is necessary to be defined on tooth of pinion gear a cam-shaft.

The diagram of an arrangement of components of drive GDM

1 - the Adjusting scale
2 - the Label of position TDP of the piston of the first cylinder*
3 - the Tension roller
4 - Automatic tensioner of drivebelt
5 - Adjusting labels
6 - the Label of position TDP of the piston of the first cylinder **
7 - the Cogwheel of a camshaft of the left head of cylinders
8 - the Pulley of a drive of the water pump
9 - the Intermediate cogwheel №2
10 - the Belt of drive GDM
11 - the Cogwheel of a cranked shaft
12 - Intermediate rollers
13 - the Cogwheel of a camshaft of the right head of cylinders
* the Piston of the first cylinder is in TDP when the label of position of the piston on a cogwheel of a cranked shaft is combined with an adjusting label on the block of cylinders.
** the Piston of the first cylinder is in TDP the end of a step of compression when the label of position of the piston on a cogwheel of a camshaft is combined with an adjusting label on a cover of drive GDM.

Generalize procedure of replacement of belt GDM (without taking into account mark of the car) can be presented as follows:
Removal of belt GDM:
• To switch-off a wire of "weight" from the accumulator battery. To turn away fastening a casing of the fan, to remove the fan. To remove a casing of the fan.
drivebelts.
• To remove a pulley of the water pump.
• To turn away fixing bolts, to remove a cover drivebelt .
• To turn away a nut of the tension device and to wring out supporting roller back. To block a spring in the given position.
• To turn away fixing bolts and to remove a pulley of a cranked shaft.
• Cautiously to remove a belt.
Belt it is necessary to replace everyone of 45000, 60000, 72000, 90000 km of run (depending on the engine of the car). It is necessary to replace it also in case it has frayed, has become impregnated with oil or if it has been installed on the car, being some time for preservation.
Installation of belt GDM:
• If at the removed belt was set in motion a cranked shaft, intermediate or a camshaft for maintenance of corresponding position of valves and installations of the moments of ignition to expose each shaft on labels as follows .
And. To turn a cranked shaft so that a label on a cogwheel of a drive of a belt coincided with a label on a forward cover (position of 12 hours).
. To turn an intermediate shaft so that a point on a cogwheel of a drive of an additional shaft coincided with a label on a back cover drivebelt (position 4 hours).
Century To turn a camshaft so that the label on a cogwheel of a drive of an internal belt coincided with a label on a forward cover of valves (position of 12 hours).
• To install drivebelt all over again on cogwheels (to use sharp adaptations it is not recommended), and then on a roller of the tension device. On new belts there are labels. Lines on drivebelt should coincide with labels on cranked to a shaft. The following label should coincide with a label on intermediate to a shaft. To weaken a nut of the tension device (sagging of a belt the spring will remove). To crackdown a nut of the tension device.
• Having turned a cranked shaft clockwise on 1 full turn, it is necessary to be convinced, that adjusting labels coincide still.
• To clear a surface of a cover drivebelt and to install a new lining. The ordered moment to tighten bolts.
• To install a pulley of the water pump, drivebelts, the compressor of the conditioner, the pump of the hydraulic booster of a steering drive and the generator.
• To install the fan and its casing. To install belts of a drive of units. To connect a wire of "weight" to an accumulator battery. To start the engine. To watch, that there were no leaks.

serpentine belt diagram
The information was given by beltdrive.50webs.com
_____________________________________________________

drivebelts of your car: The basic requirements /Part 2/.

____________________________________________________

drivebelts of your car:
The basic requirements /Part 2/.


Belts of a drive of auxiliary units.

As it is specified above, happen V-belts and Poly-V-belts (they flat, they stream). Let's try compare their advantages and lacks.

V- belts though are considered as archaism, have some conclusive advantages. They are much cheaper flat, easily vary and actuate, as a rule one auxiliary unit. That is, at breakage, say, drivebelt of the compressor of the conditioner, other auxiliary units will continue to work. Besides V- belts stretch simple displacement of pulleys from each other so, application of tension and directing rollers do not demand. In an emergency situation V- belt it is possible to try to replace a belt any improvised means, for example, a piece of a cord or an old stocking. V- belts it is possible to carry a low resource and necessity to lacks to regulate their tension in process of their deterioration.

Poly-V-belts are considered as more modern and on the majority of cars of last years of release they are applied. Poly-V-belts it is possible to carry greater service life to advantages, than at V- belts, automatic adjustment of their tension by means of roller belt tension and ability to transmit much greater effort, than V- belts that enables to actuate all auxiliary units by means of one Poly-V-belt, as, for example, in engine AAA (VR6) from Volkswagen. However, in my opinion, all advantages Poly-V-belts turn around also their lacks. Poly-V-belts in times are more expensive V- belts, at their replacement it is necessary to change one or several tension and directing rollers, and sometimes and belt tension with a roller in gathering. Breakage Poly-V-belt actuating all auxiliary units leads to impossibility to continue movement because to go with idle simultaneously the generator, the pump of the hydraulic booster and a pomp of system of cooling of the engine do not impossibil. However, to motor-car manufacturers is more visible, and V- belts depart in the past, superseded Poly-V-belts. By the way, I shall notice, that interests of motor-car manufacturers and automobile owners at all always coincide, therefore not the fact, that flat belts really so it is better V- belts, how much they are more expensive.

Though so strict demands as to belts GDM, their duly replacement assists to avoid set of fine troubles as that also are not made to belts of a drive of auxiliary units: drivings without the hydraulic booster of a rudder, driving without the generator on the accumulator, drivings in a heat without the conditioner and, at last, standings on a roadside pending while will be cooled down "begun to boil" as a result of breakage drivebelt of a water pomp with the engine. Therefore to change belts of a drive of auxiliary units it is necessary, as well as belts GDM, according to instructions of a manufacturer. Together with Poly-V-belts tension and directing rollers without fail are a subject to replacement. To avoid unpleasant surprises use only original drivebelt and rollers.

serpentine belt diagram
The information was given by beltdrive.50webs.com
_____________________________________________________

drivebelts of your car: The basic requirements

_________________________________________________________
drivebelts of your car:
The basic requirements
In modern cars some kinds drivebelts are applied.
Here we shall consider only major of them, not touching such exotic, as for example, variator belts.
To destination they can be undressed into 2 groups:
- Belts of a drive of gas-distribution mechanism (belts GDM)
- Belts of a drive of auxiliary units.

On a design on 3 kinds: gas-distribution mechanism
- Gear belts. Are applied, as a rule, to a drive of mechanism GDM
- Flat Poly-V- belts. Are applied to a drive of auxiliary units
- V-belts. Are applied to a drive of auxiliary units.

Part 1. Belts of a drive of the gas-distribution mechanism

To belts GDM the highest requirements by way of reliability and longevity because breakage of belt GDM conducts to very serious to consequences in the form of fault valves, heads of the block of cylinders and, sometimes, pistons are applied. Differently, breakage of a belt, cost up to 50 dollars leads to repair in cost not less than 1500 dollars. Conversations that, say, there are engines in which design the opportunity of breakage of belt GDM is specially stipulated and on such engines breakage of any catastrophic consequences does not carry all, are no more, than the bosh which has been thought up for self-complacency by those to whom it is banal it is a pity money for servicing of the car.

Therefore:
Use only original belts GDM. In this case no economy can cover consequences of breakage of poor-quality, defective or counterfeit belt GDM.

Change belt GDM strictly according to recommendations of the manufacturer. It is written " to change time in 80 000 km ", means we change time in 80 000 km. Any reasonings of irresponsible "masters" a theme that " it "looks as new and still resembles " in calculation to accept does not follow. Anybody from these "masters" subsequently will not make to you repair at own expense.

Always change all tension and directing rollers of belt GDM. Besides, any assurances that " this roller 100 000 more will pass" in calculation to accept does not follow for the reasons specified above. Keep in mind, that, for example, BMW in the recommendations specifies, that in case of removal of belt GDM for any reason, it is a subject to replacement, without dependence from when it changed before.

Do not rely on the memory. Write down run of the car at the moment of replacement of belt GDM. For this purpose there are the special tablets-labels pasted on a visible place in a motor compartment of the car.

Replacement of belt GDM is better to make at the authorized dealers. I am far from an idea, that the authorized dealer is the best variant among car-care centers, but for the works they even give a guarantee and, in case of problems with belt GDM, you can take advantage of this guarantee.

If you managed the second-hand car with unknown history at once change not only oil, but also belt GDM (if it, certainly, on the given engine is). Selling the second-hand car people are not inclined to invest in preselling preparation.

serpentine belt diagram
The information was given by beltdrive.50webs.com
_________________________________________

Sunday, January 18, 2009

Revealing and elimination of the reasons of the increased noise of the engine

______________________________________________________

Revealing and elimination of the reasons of the increased noise of the engine

All engines should rustle. But at the same time any of shades of noise should not be allocated. More often noise is published with bearings and belts. Happens, that the pump of the hydraulic booster in a rudder, and in overwhelming majority of cases of rustles that in it there is not enough oil.To determine the reason of noise, it is necessary to remove and compare on one belt noise and .

First to remove belts of the hydraulic booster - to start and listen, then - a belt of the pump of the conditioner (it is not out of place for removing in general, not to tropics at us) and again to listen, and the order of removal of belts can be any, convenient for you. However, it is possible to taste from syringe serially to water all belts and if in noise that belt on which working surface water noise will disappear gets is guilty or will change. If all belts are removed, and the engine still rustles (with the removed belt of water cooling the engine of 1-2 minutes can work without consequences), that, means, bearings in rollers on which a gear belt gas distribution rustle. If it (bearings) to change greasing, noise, most likely, will stop. But happens, that greasing any more does not help, it is necessary to change the bearing.

From practice follows, that with the first bearings of the water pump, the generator, a bypass roller, a tension roller start to rustle. Then already others. But, certainly, this all depends on that, belts are how much strongly tense. The the belt is more strongly tense, the will more strongly rustle (and then the bearing something will collapse), that is resulted in rotation by this belt. When belts are removed, it is possible to twist fingers any roller (or a shaft if it is a question, for example, about the generator). Making it, closely listen. If at rotation you feel a rhythmical roar of rollers which are rolled inside of the bearing this bearing should change greasing immediately. If at rotation you will feel even one jamming or a roar of balls spasmodic - it is necessary to change the bearing because at it (it is visible on paths on which balls slide) the surface has already started to be painted and from it anywhere will not get to.

If at the bearing is any feel backlash (shake the platen which in it press on or an external holder concerning internal) also search new. In the old bearing it is possible to put in pawn new greasing and to do a bit of travelling it is a little, but only in the event that it costs somewhere in the generator or in the pump of the conditioner. If it is installed, for example, in a tension roller of a gear belt gas distribution on the diesel engine do not risk, estimate, in what to you repair when the bearing with backlash will collapse will manage or will jam.

Often happens, that start drivebelts (for example, the generator).
Do not rush to pull this belt at once. Perhaps, it that chock any the bearing or this belt has simply grown old: rubber on it tanned, here it and slip. To tighten a belt it is possible, but loading on the bearing (generator) that will not add to it longevity at once will increase.


serpentine belt diagram

The information was given by beltdrive.50webs.com
_____________________________________________________